Aaron’s insatiable love for cheesecake meets the delightful onset of autumn – apples galore! Childhood memories of apple-picking escapades with the family and the annual apple festival in my hometown have practically infused my soul with all things appley 😋. So, when fate led me to stumble upon a recipe for apple cheesecake cookies, I knew destiny was calling our taste buds.
Let me tell you, these creations turned out beyond amazing! A harmonious symphony of warm spices danced with the crisp apples, while the cream cheese added its signature tangy sweetness. To take things to the next level, I couldn’t resist drizzling a bit of caramel on top – muah* 😗. It was the ideal finale to a drizzly, lackluster day!
For the base of this delectable treat, I turned to the Cake Babe Bakery recipe, but of course, I couldn’t resist adding my own personal twists to make it uniquely mine. And instead of mere cookies, I transformed my version into delightful bite-sized mini-desserts.
Ingredients:
Apple Filling:
3 Large Apples – Peeled & Diced
1 Tbsp. Lemon or Lime Juice
1/2 Cup Granulated Sugar
3/4 tsp. Ground Cinnamon
1/2 tsp. Cardamom
1/2 tsp. Nutmeg
Sprinkle of Apple Pie Seasoning (Optional)
Pinch of Salt
2 Tbsp. Cornstarch
1/4 Cup Cold Water
Caramel Sauce Topping (Optional)
Cream Cheese Filling:
8oz Cream Cheese (Room Temp.)
1/3 Cup Granulated Sugar
1 Egg Yolk
Cookie Dough:
1 Cup Butter
3/4 Cup Brown Sugar
1/3 Cup Granulated Sugar
2 Large Eggs
2 tsp. Vanilla Extract
2-1/2 Cups Flour
1 Tbsp. Cornstarch
1-1/2 tsp. Baking Powder
1 tsp. Salt
1 tsp. Cinnamon
1 tsp. Cardamom
Directions:
Apple Filling:
- Begin your epic apple transformation by placing those innocent apples into a saucepan, along with a dash of lemon or lime juice, some sugar (because we’re turning these apples into sweet-talking charmers), and a sprinkle of spices. Give them a good stir, making sure each apple feels adequately coated in its newfound flavorful attire.
- Now, onto the stovetop, my fearless culinary explorer! Set the burner to medium-high heat and plop that saucepan onto it. It’s showtime! Keep an eye on the mixture, stir occasionally (because even apples like a good spin), and make sure it doesn’t decide to play with fire.
- In a separate bowl, summon your inner mad scientist and whisk together cornstarch and cold water. Watch as they join forces to create a mysterious concoction known as a “slurry.” It’s like a secret weapon for thickening things up.
- As those apples begin to spill their juicy secrets and soften in the simmering sauna, introduce the slurry into the saucepan. But beware! This is a high-stakes operation. Stir like your culinary reputation depends on it. The mixture should thicken faster than you can say, “Is it ready yet?”
- Once your apple creation has transformed into a gloriously thick concoction, pull it off the stage (aka, remove it from the heat) and escort it to a container. This is its cool-down period – a necessary moment for it to gather its thoughts and become the apple filling it was destined to be.
- Pop it in the fridge, where it can hang out and chill (literally) until it reaches the pinnacle of coolness. It’s a filling with standards, so it can keep its composure in there for up to a week, as long as it’s sealed up tight in an airtight container.
Cream Cheese Filling:
- In the mystical realm of a medium bowl, summon your trusty electric hand mixer. As it purrs to life, whip that cream cheese into submission. It’s a smoothness showdown, and you’ve got about 2 minutes to make it submit to your creamy will. If it resists, just remind it who’s the boss (you are!).
- Now, don’t be fooled by the cream cheese’s apparent surrender. Scrape down those bowl sides and introduce the granulated sugar. Mix until they form an unholy alliance of sweetness and smoothness. This is culinary diplomacy at its finest.
- Time for the egg yolk to join the party! Mix it in until there are no rebellious streaks left. This is a yolk-y mission of unity, and it’s your duty to ensure they blend like the best of pals.
- Next, you’ll need to prepare your cream cheese creation for its grand entrance. Think of it as sending your cheese superhero into the fridge fortress to await its destiny. Equip yourself with a piping bag (your cream cheese superhero’s trusty steed) and gently place your creation within. Pop it into the fridge, where it’ll cool its heels until you decide to unleash its creamy powers on your culinary conquest.
Cookie Dough:
- In the grand arena of a stand mixer (or a large bowl, for those who like a more hands-on approach), the butter takes center stage. Cream it alongside the granulated and brown sugar on high speed. Whip it, beat it, make that butter feel like it’s on a fluffy cloud.
- Eggs, prepare to make your entrance! One by one, you’ll join the buttery party and mix until you become one harmonious ensemble. Think of it as a cookie conga line; everyone’s invited!
- Time to pause the mixer and bring in the star of the show – vanilla and the rest of the cookie cast. Cue dramatic music! They’re here to steal the spotlight and add their unique flavors to the mix.
- As the dry ingredients make their entrance, you’re going to want to play it cool. Mix on low, just enough to blend everything together. We’re looking for a dough that’s not overly clingy, sort of like the cool, mysterious character in a movie – drier and a bit clumpy.
- Now comes the fun part: divide the dough into eight equally-sized balls. Each one should be roughly 4 ounces, so feel free to break out your inner dough-weighing expert. Roll those balls in your hands until they’re as smooth as a politician’s promises. They’re about to embark on a delicious adventure!
- But hold your horses, dough balls! Before you hit the stage, it’s time to chill out. Pop those little spheres of potential into the fridge for a 1-2 hour dough spa session. They need to gather their composure before their grand entrance into the world of cookie assembly.
Assembly & Baking
- Continue your culinary odyssey by cranking that oven to a toasty 375 degrees. It’s like giving your kitchen a warm, inviting hug. While you’re at it, roll out the red carpet for your cookie sheets, lining them with the fanciest of parchment paper or silicon mats. After all, these cookies are VIPs.
- Gather ’round, cookie balls! It’s time to make your debut. Line up four of these doughy divas on each sheet, and give them a little pep talk. “Ladies and gentlemen, tonight, we’re transforming into pie crust shapes for a grand purpose – cookie cups!” Flatten them gently, as if they’re preparing for the cookie catwalk.
- The cream cheese filling – your moment in the spotlight! Pipe it in with the precision of a seasoned pastry artist, filling the bottom half of the cookie cup. We’re talking a cream cheese layer so even, it could win a talent show.
- It’s time for the apple filling to make its dramatic entrance. Crown your cookie cups with this fruity delight, filling in the top half like they’re auditioning for a starring role in the next big baking blockbuster.
- While the anticipation builds, let these beauties bask in the spotlight of the oven for 15-18 minutes. They’ll emerge as light golden heroes, ready to take on the world (or at least your taste buds).
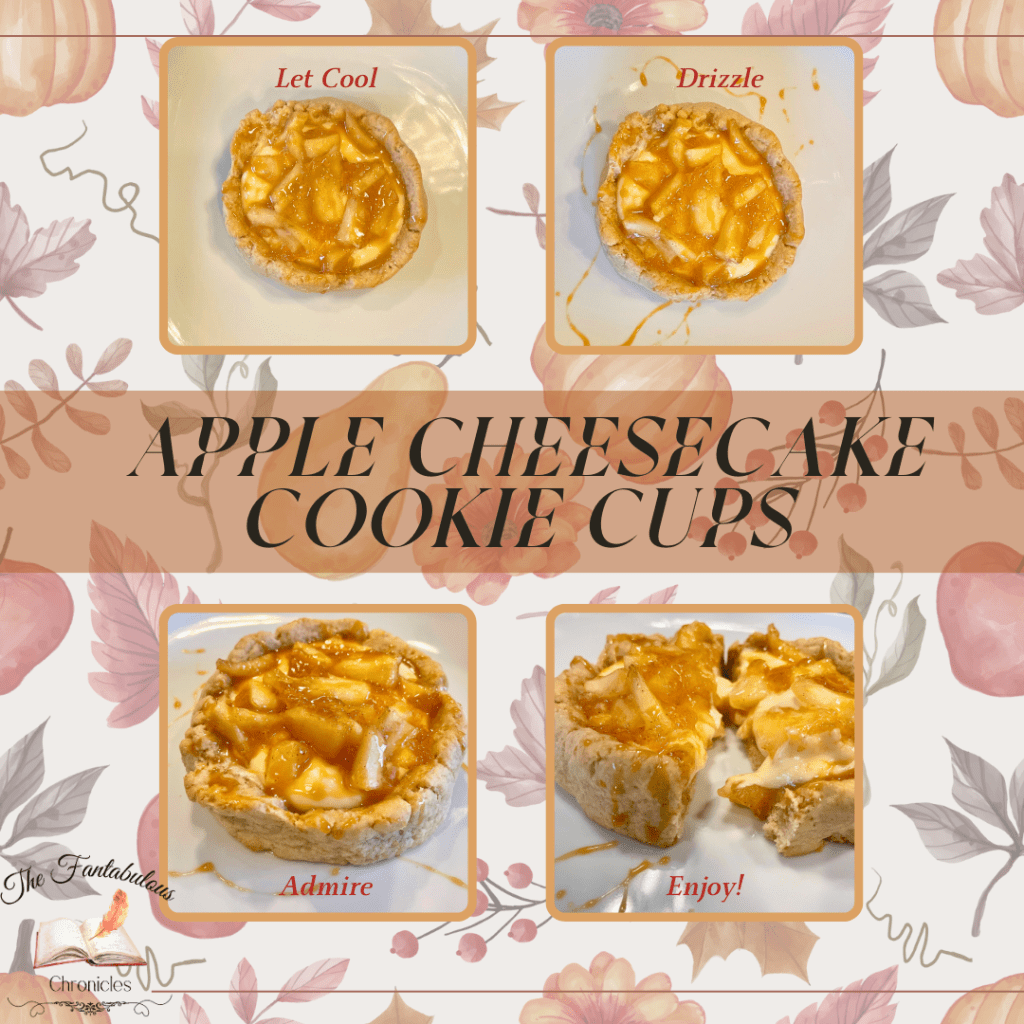
- Now, patience is a virtue, dear baker. These cookies need a cool-down period worthy of a celebrity diva.
- Finally, the big reveal! Bring those cookies back into the limelight and drizzle them with caramel sauce. It’s their Oscar moment, and they’re ready to shine.
- Cue the applause! These delectable stars are ready for their close-up. Serve and bask in the sweet glory of your baking masterpiece. It’s time to savor and enjoy the delicious finale of this epic baking saga! 🍪🌟
Do you have any cherished autumn recipes that whisk you away down memory lane? Share your flavorful nostalgia with us in the comments below! 🍂🍁👩🍳

Leave a comment